
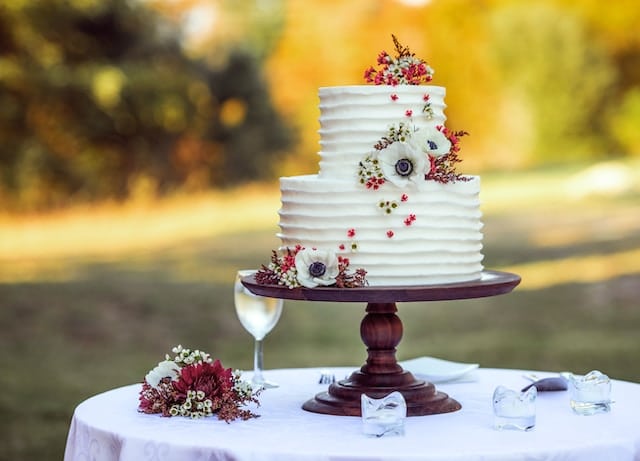
How to Bake a Multi-Layered Wedding Cake with Simple Decorating Tools?
Baking a wedding cake might seem like a daunting task. However, once you break it down into manageable steps, you will realize that with the right ingredients, tools, and a bit of patience, it’s not as challenging as it may seem. In this tutorial, we are going to guide you on how to bake a multi-layered wedding cake, complete with buttercream frosting and simple yet elegant decorations. Get your spatula ready, and let’s dive in.
Gathering Your Ingredients and Tools
Before embarking on your baking journey, it’s essential to gather all the necessary ingredients and tools. You will need cake ingredients for your chosen flavor, buttercream for the filling and frosting, and a variety of decorating tools.
A voir aussi : What’s the Key to Crafting a Perfectly Emulsified Hollandaise Sauce?
Let’s start with the cake ingredients. Depending on the flavor you want, the ingredients will vary. However, most cakes will need flour, sugar, eggs, and a rising agent such as baking powder or baking soda. For a chocolate cake, you will need cocoa powder, and for a vanilla cake, you will need vanilla extract.
Now let’s talk about buttercream. Buttercream is a type of icing used as a filling between the layers and as a coating on the outside of the cake. It’s made from butter, icing sugar, and a small amount of milk or cream. Some bakers also add a flavoring such as vanilla or almond extract.
Avez-vous vu cela : Can You Create a Signature Gourmet Hot Dog with Artisanal Toppings?
Finally, let’s discuss the tools. You will need cake pans (the number depends on the number of layers or tiers you want your cake to have), a spatula for spreading the buttercream, a serrated knife for leveling the cake layers, and a cake turntable for easy decorating.
Baking the Cake Layers
Once you have all your ingredients and tools, it’s time to start baking. Your first step is to bake the cake layers.
First, preheat your oven to the recommended temperature according to your cake recipe. Meanwhile, prepare your cake pans by greasing them with butter or cooking spray and lining them with parchment paper. This will prevent the cake from sticking to the pans.
Next, follow your cake recipe to prepare the batter. Pour the batter into the prepared cake pans and bake in the preheated oven. The baking time will depend on the size of your cake pans and the specific recipe you are following.
Once the cakes are baked, let them cool completely before moving on to the next step. This is crucial because if the cakes are not completely cool, the buttercream will melt when you start to assemble the cake.
Leveling and Filling the Cake Layers
Now that your cakes are cool, it’s time to level and fill them. Leveling the cakes ensures that they will stack nicely without any gaps. Filling adds flavor and keeps the cake moist.
To level the cakes, place each layer on a flat surface and use a serrated knife to slice off the rounded top, making the cake flat. Be careful to keep the knife level to ensure an even cut.
After leveling, place the bottom layer on your cake turntable. Spread a generous amount of buttercream on top using a spatula. Then, gently place the next layer on top, making sure it’s centered. Repeat this process for all your layers.
Coating the Cake with Buttercream
With all your layers stacked and filled, it’s time to give your cake a crumb coat. This is a thin layer of buttercream that seals in the crumbs, so they don’t end up in the final coat of frosting.
Using a spatula, spread a thin layer of buttercream all over the cake, making sure to cover the top and sides. Don’t worry if you can see the cake through the frosting; this is just the crumb coat. Once the cake is fully coated, refrigerate it for about 30 minutes to let the crumb coat set.
After the crumb coat has set, apply a second, thicker layer of buttercream. This is your final coat and should fully cover the cake. Use the spatula to make the frosting smooth and even.
Adding the Final Touches with Simple Decorating Tools
Now comes the fun part – decorating! You don’t need fancy equipment to make your cake look stunning. With a few simple tools, you can create a beautiful, wedding-worthy cake.
One easy way to decorate is with a piping bag and different nozzles. You can pipe rosettes, stars, or dots around the top or bottom edge of the cake. Add a few fresh flowers or edible pearls for an extra touch of elegance.
Another simple but effective decorating technique is the rustic look. After applying the final coat of buttercream, use your spatula to create a swirled effect all over the cake. This gives the cake a rustic, homemade feel, perfect for a laid-back or outdoor wedding.
Remember, when it comes to cake decorating, less is often more. With a bit of patience and creativity, you can create a stunning multi-layered wedding cake that will be the talk of the celebration.
Creating a Stable Cake with Cake Boards and Dowels
If you’re planning on a multi-tiered cake for a grandeur effect, it’s crucial to ensure stability. For this, you’ll need cake boards and dowels. This step may seem intimidating, but with the right guidance, it’s easier than you think.
Each cake tier should be baked and decorated separately. Once each tier is ready and fully cooled, place it on a cake board that is the same size as the cake. The cake board provides support, making it easier to move and stack each tier.
To prepare for stacking, you will need to insert dowels into each cake tier except the top. Dowels are rod-like structures, made from wood or plastic, which act as supports for the cake tiers above. Measure the height of your bottom cake layer, subtract the thickness of the cake board, and cut the dowels to this length.
Then, with your bottom tier on a larger cake board, insert the dowels evenly spread around the center. Ensure the dowels are inserted straight down and that they all reach the same height.
Next, carefully lift your second tier (which should already be on its own cake board) and gently place it on the dowelled bottom tier, making sure it is centered. Repeat the dowelling process before adding each additional tier.
Remember, the cake board and dowels are integral for a multi-tiered cake. They provide the necessary support and stability and ensure that the cake doesn’t collapse under its weight.
Wrapping Up Your Wedding Cake
After all the hard work, it’s time to wrap up your wedding cake. This final step involves storing your cake properly before the big day and transporting it safely to the venue.
Once you’ve completed your cake, it’s crucial to store it in a cool, dry place. If you’re not serving the cake the same day you finish it, cover it with plastic wrap to keep it fresh. However, take care not to mess up your buttercream frosting or decorations.
On the day of the wedding, carefully move your cake to a flat, sturdy surface for transportation. It’s best to keep the cake in a cool, temperature-controlled environment to avoid any potential heat damage.
While transporting, keep the cake level and drive carefully to avoid any sudden movements that could damage the cake. Once at the venue, do any necessary touch-ups and place the cake on display for everyone to see and admire.
Concluding Reflections
Baking a multi-layered wedding cake may seem like a monumental task, but with the steps outlined, careful planning, and a bit of patience, you too can create a stunning centerpiece for your celebration. Remember, a wedding cake is not just about looking good; it’s also about tasting good. So choose your flavors wisely, and don’t forget to have fun in the process.
From gathering your ingredients and tools to baking and leveling your layers, filling and frosting your cake, adding the final touches, ensuring stability with cake boards and dowels, and finally storing and transporting your masterpiece, each step is crucial on the path to creating your dream wedding cake.
So don your apron, preheat your oven, and get ready to bake a stunning multi-layered wedding cake that will be remembered for years to come. You got this!